Cross Compilation Exercise
The objective of this exercise is to walk through a more comprehensive project setup for compiling code for a ARM cortex based MCU.
While any dev board can be used, we are going to proceed with the intent of compiling a project for an STM32F4 dev board with a ARM cortex M4 processor to demonstrate. That said, the goal is to create a project environment where you can quickly switch targets between deve boards.
We will provide an example project with source code written to toggle an LED. You will be responsible for updating the CMake files to properly supportcross-compilation.
Getting Started with Cross-Compilation
To get you started, we’ve already provided the files you will need to modify in the project repository. We are taking advantage of layered toolchain files, which allows us to modularize our cross-compilation process. By simply defining a new toolchain file or target, we can easily change our build target between multiple microcontrollers such as the Atmel SAMW25, Nordic nRF7002, or the STMicroelectronics STM32F4 series.
Revised Project Structure with Toolchain files
Nothing is required for this section but a quick foreword this is a quick foreword regarding the starter project. Earlier, we described a simple project/directory structure for your CMake projects in order to maintain good organization for your projects. Toolchain files shouldn't compromise that efficiency in development environments. In order to keep a good project structure, we are going to make some modifications/updates to the design we provided earlier. If you do not have a cmake folder present, make one now. This shall hold all tools, scripts, toolchain files, and any auxiliary items used during the build process. As far as build systems are concerned, you might devise a structure that looks like so:
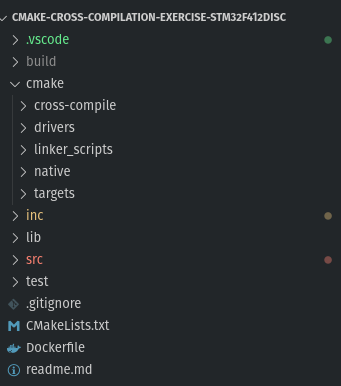
- cmake/cross-compile: Toolchain files for the compiler and target processors
- cmake/drivers: Toolchain files for any low-level dependencies such as ARM CMSIS
- cmake/native: Toolchain files for native compilers for applications that run natively
- cmake/targets: Toolchain files defined for embedded targets
- cmake/linker_scripts: A collection of linker scripts for each target
Our starting proejct has some example toolchain files that are already setup that you are free to reference.
1. Defining the Linker Script
The linker script informs the compiler (more accurately, the linker) what data should be populating which addresses and sections of memory. This is important because embedded systems almost have specific memory regions for each part of your application.
For example a linker script for a nrf7002dk dev board is included in your project under the cmake/linker_scripts subfolder. Feel free to take a look at the code, but the content of linker scripts is outside the scope of this exercise.
For this section, you must update the LINKER_FILE_NAME and LINKER_FILE_PATH variables in cmake/target/stm32f412.cmake. with the linker script and the path to the linker script’s folder, respectively. The function call has already been added, you only need to add the file name and paths.
####################################
# TODO: Set linker file name       #
####################################
set(LINKER_SCRIPT "")

####################################
# TODO: Set linker file path       #
####################################
set(LINKER_SCRIPT_PATH "")

# Set linker flag arguments
set(LD_FLAGS "-T${LINKER_SCRIPT_PATH}/${LINKER_SCRIPT}" CACHE INTERNAL "LD_FLAGS")
2. Setting the Compiler Flags/Options
Compiler flags, in simple terms, instruct a compiler on how it should compile a program. The flags utilized can vary based on the target architecture, toolchain, and hardware supported. We won’t discuss what each item represents, although some will be intuitive enough to gather the meaning. For this section, you need to update the CPU_NAME, CPU_FLAGS, and VFP_FLAGS variables in the cmake/cross-compile/cortex-m33_hardfloat.cmake file with the correct compiler flag arguments or value. We are providing the necessary compiler flags. You only need to update the predefined variables with the value.
| Variable | Value |
|---|---|
| CPU_NAME | cortex-m4 |
| CPU_FLAGS | -mcpu=cortex-m4 -mthumb -mabi=aapcs --specs=nosys.specs -fno-strict-aliasing -fno-builtin --short-enums -falign-functions=16 -std=gnu99 |
| VFP_FLAGS | -mfloat-abi=hard -mfpu=fpv5-sp-d16 |
####################################
# TODO: Set CPU name               #
####################################
set(CPU_NAME "" CACHE INTERNAL "CPU_NAME")

####################################
# TODO: Set CPU flag               #
####################################
set(CPU_FLAGS "" CACHE INTERNAL "CPU_FLAGS")

####################################
# TODO: Set VFP flags              #
# (Vector Floating Point)          #
####################################
set(VFP_FLAGS "" CACHE INTERNAL "VFP_FLAGS")
3. Managing External Dependencies
At this point, you've done a lot of the hard work for your cross-compilation project. There are a few remaining items (i.e. startup files) but for the most part you have a project that supports cross-compilation. There's one caveat though (kinda). You don't have any libraries. You could certainly make your especially if you know the memory layout and peripheral addresses on your target platform/device. However, it is just as likely that you may want to use a HAL or driver in your project. Luckily, many popular drivers, frameworks, and HALs are publicly available either through GitHub or the manufacturers website.
For this project, we are going to be working to get the STM32CubeF4 package installed and linked with our project. This package includes drivers, HAL, board support packages (BSP), and startup scripts for many of the STM32F4 development boards.
3.1 Fetching the dependencies
Most of the content here will overlap from the Managing Dependencies Guide. We want to use the FetchContent module and it's functions to download the git repositories for the STm32CubeF4 package. If you wanted to download another package or library for your target, a similar set of steps would apply.
Note
Some packages have built-in support for CMake and will not require the user to create a CMake (library) target. Essentially there will be predefined targets in the module if CMake support is already included.
Start by opening the cmake/druvers/STM32CubeFr_driver_package.cmake file. Use the fetchcontent_declare and fetchcontent_makeavailable functions to get the STM32CubeF4 package v1.28.1.
Tip
You can use the GIT_REPOSITORY and GIT_TAG arguments to instruct CMake what package to download and the specific version of the package to target.
# Acquire STM32CubeF4 driver package
fetchcontent_declare(
        stm32cubeF4-drivers
        GIT_REPOSITORY <INSERT_GITHUB_LINK_HERE>
        GIT_TAG <INSERT_GIT_TAG_VALUE_HERE>
)

fetchcontent_makeavailable(stm32cubeF4-drivers)
| Attribute | Value |
|---|---|
| GIT_REPOSITORY | https://github.com/STMicroelectronics/STM32CubeF4 |
| GIT_TAG | v1.28.1 |
3.2 Setting some relevant paths
Open the link to the STM32CubeF4 repository. Notice that there are a lot of subfolders and device specific folders. We only need to use a subset of these at a time when working with any board target. In order to stremaline this process we are going to set up some variables with the few paths that we shall need. In particular for this library we want to set up three path variables:
| Variable | Description |
|---|---|
| STM32CubeF4_HAL_PATH | Path to the Hardware Abstraction Layer (HAL) files for the STM32CubeF4 package |
| STM32CubeF4_BSP_PATH | Path to the top-level BSP folder (non-device specific) |
| STM32CubeF4_ARM_CMSIS_PATH | Path to the top-level ARM Common Microcontroller Software Interface Standard (CMSIS) |
The next question is probably how you can go about figuring out the exact path to each of these variables. From our perspective there are two ways:
-
Build the CMake project so that package is available locally. You can then captuer either the relative or absolute path and set the variable name accordingly.
-
Using both the builtin CMake variables for fetched packages and the respoitory structure as a refernce, slowly start assigning the paths. This way can be more difficult since you don't have the exact path of the file to reference but ultimately results in a cleaner solution.
As far as which option to pick, if you were working on the project alone and there are no plans to share it with others, setting absolute paths can be the quick and easy solution. However, if you are working on a large scale project, you should definetly take advantage of the built-in CMake variables and use relative paths.
To make this step easy and not to waste too much time to show an example of the recommended way of setting up paths, we are providing the relative path for all three paths. It is worth noting that each path starts with stm32cubef4-drivers_SOURCE_DIR. From observation, we can gather that the first half of that keyword is the name of our dependency that we downloaded but all lowercase. However the second part of the keyword ending in _SOURCE_DIR is important. When you populate a package or dependency via the fetchcontent module, you can access certain attributes of that dependency including but not limited to where it was installed (i.e. _SOURCE_DIR). There are more attributes ou can take adavnatage of but you will olikely use them sparingly or based on the difficulty of the project.
Note
See the FetchContent documentation for more details.
** Relevant Library Paths: **
####################################
# Set Relevant Library Paths
####################################
set(STM32CubeF4_HAL_PATH ${stm32cubef4-drivers_SOURCE_DIR}/Drivers/STM32F4xx_HAL_Driver)
set(STM32CubeF4_BSP_PATH ${stm32cubef4-drivers_SOURCE_DIR}/Drivers/BSP/$ENV{STM32CubeF4_BSP_TARGET})
set(STM32CubeF4_ARM_CMSIS_PATH ${stm32cubef4-drivers_SOURCE_DIR}/Drivers/CMSIS)
3.3 Setting up Library Targets:
Now that you have the paths to important subfolders defined, all that is left is to set up the library targets and link them at the end.
How you decide to setup each library is up to you but we would recommend defining three static library targets then setting the source files and include directories accordingly:
- STM32CUBEF4XX_HAL : Static library target for STM32 HAL files
- STM32CUBEF4XX_BSP : Static library target for BSP files
- ARM_CMSIS : Static library target for low-level ARM Cortex cpu files and funcitions
4. Setting the Path to the Toolchain File
The last step in enabling cross-compilation is passing the path of the toolchain file to CMake either via the command line, an IDE menu, a json file, or by directly defining the path from your CMakelists.txt file.
Command line:
- From your terminal, navigate to your build output directory
- Run the CMake command but add the -D argument, which allows us to set a CMake variable
cmake .. -DCMAKE_TOOLCHAIN_FILE=<path to toolchain file>
Somewhat magically, CMake knows (or predicts) when you intend to enable cross-compilation. When the CMAKE_SYSTEM_NAME variable is updated, CMake will set the CMAKE_CROSSCOMPLING variable to true, indicating a cross-compilation build. Typically, we update the CMAKE_SYSTEM_NAME variable through the referenced toolchain file.
- If your build output folder is already configured, you will need to remove all CMake-generated files when you modify your toolchain file. CMake will not automatically rebuild its cache when the toolchain file is modified.
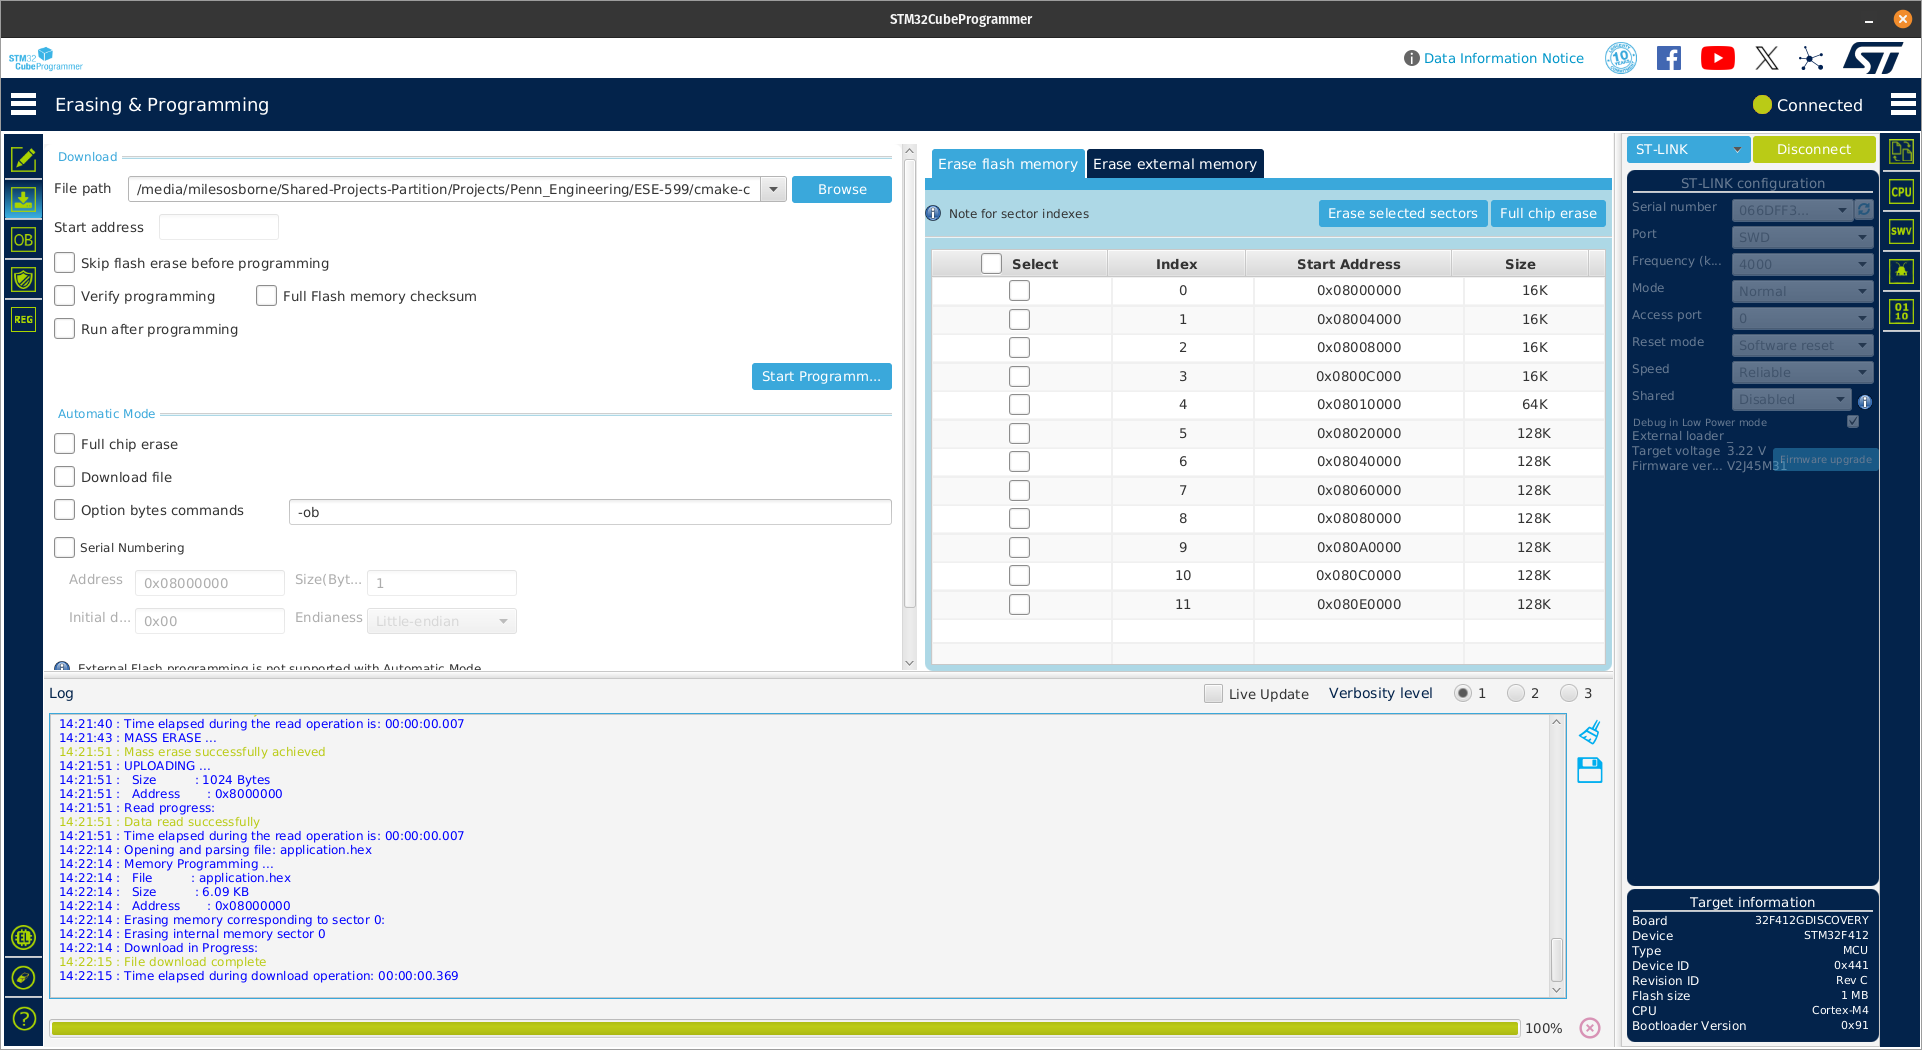
5. Building and Flashing
Now that you have successfully built and compiled your project, all that is left is to upload to your target of choice. You can use any flashing software of choice but for the sake of demonstration, we shall use the STM32CubeProgrammer which you can download from here